Sunday, July 26, 2015

Birthday Boards

Recently we moved houses and I have been doing a lot of remodeling to get the new house ready and fixing up the old house to get ready to sell. This put the blog on hold for a bit which is why this article is coming out well after Christmas. With that said here you go.

My wife and I have decided that we would like to start creating things for gifts. The main reason we wanted to do this is that most of the people in my family and hers buy things when they want them. So what do you buy people when they have everything? Nothing, you make them something. 

My wife is an avid Pinterest user and came across Family Birthday boards. I liked the idea and the boards seemed simple enough to make. So below you will see my attempt at making a few for Christmas gifts last year.

The first piece here is a test piece to try and figure out what router bit to use and what paint method would look best. The roman ogee bit fit best with the antique and worn look I was going for. I will go into the paint method below.


I cut four boards out of pine to 22 inches long, and then routed them with a Roman Ogee bit.

Here is a closer look at the routed profile.

Okay, here is where things get antique-ey. I used a dark color paint as an undercoat and then painted on an antique white color.


After the paint dried I took some sand paper and gave the wood that old worn look.

I needed to pre-drill the holes to to hang the tags from and in order to do that I setup my drill press with a larger fence than the one that comes with it to give some stability to the board. I used a pretty small drill bit and put 12 holes in equally spaced.

I started the eyelets by hand and then used my awl to get the rest of the way in.

Here are all four boards mostly done.

We bought a Cameo Silhouette cutting printer to use for this project, but after using it I am sure we will use it much more. We made a layout of what we wanted to see on the boards and cut it out of vinyl.

I used as close to a royal blue as I could get. I think this color goes good with the under coat of paint and the over coat of antique white.

Transferring the vinyl to the board was probably the trickiest part of the whole project.

As I said transferring the vinyl was difficult (one of these things is not like the others.) That being said I think they look great. Boards done!

With the boards done it was time to make the discs that would hang from the boards. I had considered making discs from dowels or buying some from a craft store but I found some on Amazon way cheaper than the craft stores and much easier than cutting them from dowels. I figured out how many I needed and taped them to some painters tape so I could lift them after painting and not have the stick to the board.

I clamped them to the rafters after painting to dry.

All of the discs needed to be drilled top and bottom for rings/hooks. I had attempted to make a jig to drill through multiple discs at once, however the drill bit is very small and would not stay straight. I ended up just setting up my fence and drilling them one at a time.

My wife has some jewelry tools and supplies that I was able to use to make the rings/hooks.

After separating the rings I attached them to the discs with a pair of pliers.

The last step was to add mounting brackets to the boards.

Here is one of the finished boards hanging in my wife's parents house.

Sunday, July 12, 2015

Dressing up the new house: Curtains, take 1

Our new house has gone through quite the renovation since we bought it.  Carpets were torn out, walls were moved, pipes for radiant heat were laid down under the new floor, paneling was replaced by drywall, you get the picture.  Fresh coats of paint were applied in all of the renovated rooms, and the whole place looks a billion times better.  Only one problem remains.  (Okay, not totally true, there's still moving, and regular house maintenance, and all that jazz, but I'm trying to be dramatic. Go back and re-read this paragraph with a movie announcer voice in your head.  Do it!)

Our windows need curtains.  So we decided that I should make some.  Should be a piece of cake, how difficult can it be to make curtains?  (cue Jeremy Clarkson asking "how hard can it be")

First we measured the windows.  Then we painted some scraps of drywall to match fabric to the paint in each room.  We went to Joann Fabric and bought some fabric.  I looked at some tutorials for sewing curtains online.  These tutorials are not as easy to find as I expected, apparently no-sew curtains is currently what all the cool kids are doing.  Meh, I've never been one of the cool kids.

The fabric was washed. I created a spreadsheet to understand curtains (no joke).  I realized that curtain rod height needs to be accounted for, but we don't have curtain rods.  We determined that painted PVC curtain rods are pretty cool (thanks Pinterest), and we'll make our own.  Measurements were retaken, numbers plotted in, calculations were made, and then there was the realization that we don't have enough fabric to make the curtains.

The spreadsheet was reviewed, insufficient fabric was verified (only for two of the four windows though, not as bad as initially thought), and another trip to JoAnn's was underway.  Followed by more fabric washing.  Followed by a huge lapse in time where I procrastinated making curtains because I'm overwhelmed and don't want curtains to beat me, again.

Time passes...  Seasons change...  Alright, it was maybe three weeks, but that may have aligned with the start of spring.

Motivation struck, so I began pressing the fabric.  And the ironing board kept collapsing.  At one point, I had stopped ironing to chat with a friend who had stopped by, and the board collapsed, all by itself.  To be fair, this has happened the entire time I've had this ironing board, but again, how difficult should it be to make some basic curtain panels?  The board was closed, flipped over, and studied intensely.  The interwebs were consulted.  Turns out one side of the metal piece that the rod slides through in the center of the board was pushed up into the top piece, which was twisting the whole mechanism.  Lee popped it back where it should be, and now it works perfectly.  Yay!

Once all the creases were removed from the fabric, cutting ensued.  This required a bit too much thinking on my part, because the curtain panels are larger than my cutting mat.  Simply folding the fabric in half lengthwise and measuring half of the total required distance from the fold worked splendidly for the first panel.  For the length, I folded the fabric widthwise (so it would fit on the cutting mat), and measured from the edge I had squared off for the first panel.  I measured from that cut for the second panel.  One of the panels ended up longer than the other, but the shorter one was the right length so it didn't matter.  Things are finally looking up.

I created a side hem by ironing a 1" hem with wrong sides together.  I turned the raw edge under the fold, and pressed again, making it a 1/2" hem.  I used some Clover Wonder Clips to hold the hem in place, and repeated on the other side, then on the other panel.  I sewed the hem closed with about an 1/8" seam allowance from the inside edge of the hem (not the edge of the curtain).  This was repeated on the other side, then the other panel.

Next, I created the rod pocket.  I made sure my fabric was not directional (meaning there is no clear top or bottom of the print).  It wasn't, but if it was, like one of the other prints I have for curtains, I would verify that I was working with the top side of the print.  I folded over 1" from the top and pressed.  This hem was then folded over the remaining pocket height determined in my spreadsheet, which happened to be 5".  This fold was pressed, clipped in place, and sewed down with 1/8" seam allowance.  I then measured up from the seam the distance of my curtain rod pocket height, which was 3", and drew a line with a Pilot FriXion Erasable Gel Pen.  This left me with about 2" between the line and the top of the curtain panel, which will create a ruffle.  I sewed down this line.

At this point, all that remains is to hem the curtain, but we had to actually make the curtain rod and curtain rod holders first.

Once we had the curtain rod up, the curtains were hung.  We decided where they should fall, just under the window and above the hanging towel bar.  I clipped the fabric where I wanted the curtains to fall, measured the distance from the top, and created a pressed fold at that distance for both panels.  I then measured 4" below the fold and drew a line.  Excess fabric below this line was then cut off.  This left me with my 3" hem allowance and 1" to fold under.  The bottom 1" was folded over and pressed, then the hem was folded back over at the ironed line, and the seam was sewn down.


All in all, the curtains came out okay.  I ended up not making the top ruffle, since I don't really like ruffles and there wasn't really enough fabric up there to make a ruffle and still be able to take the curtains off the rod.  I don't think the standard calculation I used for the rod height (aka diameter) worked as well since we used a round pipe instead of a standard curtain rod bar.  The circumference of the pipe may be a better measurement to use.  The curtains cover the window, but aren't really drapey (is that a word?), so I think the fabric width for each panel will need to be increased for the next one.  The curtains don't look like they fall straight even though they measure out properly. Maybe I'll base the hem more on appearance than actual length next time.

I've got some additional research to do, then the laundry room curtains are on the cutting mat.  (See what I did there?  Cutting mat instead of cutting block... haha?  Okay, I'll stop now.)


Monday, July 6, 2015

We're back!

Hey everyone! Sorry we've been away for so long.  Earlier this year we bought a house, which we (totally the Royal We - Lee did all of the work) have since been renovating and slowly moving our belongings into.  We can see the end of this whole process in the not too distant future, so I figured that now would be a great time to share some of the projects that I worked on while Lee was moving walls and stuff.  I'll be posting some of our creations from last year over the next few weeks as well, as some of them deserve their own posts, and some will get them anyway.

Since I was working with very limited crafting supplies during the renovation, I only managed to work on a few knitting and crochet projects, since they take up little space and could easily be thrown into a bag and moved.  Not that I'd ever throw my projects.  :)


A friend requested a few projects to give as baby shower gifts, so I made the bobble bearded beanie by Ashlee Prisbrey and the Minion Hat and Diaper Cover with Suspenders by Ruth McColm.  Both projects were relatively easy, the patterns were well written, and being so small they didn't take up a whole lot of time.  I probably spent three weeks combined on both, but I'd only get to work on it for short periods of time every few days.


Bobble Bearded Beanie
Minion Hat with Diaper Cover and Suspenders

Lee had been asking for another hat since I made him one back in 2012.  I selected the Wasatch Backcountry Hat pattern by Christy Wall, and chose to use my handspun yarn from which Lee had picked out the fiber at the Michigan Fiber Fiesta back in May 2012.  The fiber was cjkoho designs Superwash Merino in the Stewart colorway.  Four ounces gave me a DK weight 2-ply yarn, for which I apparently did not measure the yardage after spinning.  This was one of my more recent spinning projects (probably mid-2014), so the spinning was much more consistent than my earlier attempts, but as with most things, it's really easy for me to point out all of the flaws in my own work.  Late in December, the 28th to be exact, I started knitting the hat.  Based on Lee's first hat, I knew I wanted to make the hat just a little bit shorter, which actually worked based on my gauge and row count calculations for when to decrease.  Knitting with handspun yarn, even flawed handspun like mine, is amazing.  I highly recommend it to everyone. Apparently, my handspun yarn was self-striping, which is awesome.  Anyone know how to tell what sort of cool thing handspun yarn will do when its used?


From fiber...
To yarn...


To hat

Playing outside

Our last house was in a rural area, but the area was so heavily wooded that I could barely get a few cherry tomatoes to grow on the deck, and bell peppers would rot out before they ripened.  Our new house is in the city and our back yard is open and receives lots of sun.  With the nice weather finally here and staying, I've been really excited to try growing things and composting again.  Just about everything seems to be doing well, though there has been, and will be, a learning curve.  I guess I don't have a black thumb after all.  I just didn't have the right conditions to do what I wanted.

The first group of photos are the Asiatic Lilies that I had planted last year.  These survived the move to the new house and actually grew back this year.  The other two plants that were in this planter box didn't make it.  The pink and white Lilies look tropical, and the yellow Lilies seem so bright and happy.


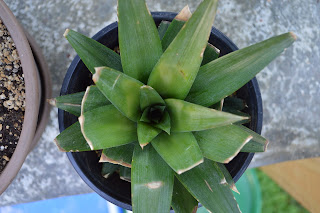
We've bought some pineapples this year, and thought we should attempt to grow our own pineapple plants from the tops.  We started growing roots on five tops, but the center of the plant where the new leaves grow became moldy on one of the plants, and was hollow on another.  These three rooted and are doing well outside.  I'll bring them back in the house in the Fall.  We'll see if they actually flower in a few years.


We found a great price on this rain barrel at Lowe's earlier this year.  We don't live in an arid area, so I think most of these plants would be fine without much effort on my part, but it seems silly to me to let all of our precipitation go to waste and end up using city water for my plants and compost during any long hot and dry spells this summer.  The barrel has been staying pretty full, even with regular use.  The plants on top seem pretty happy with their arrangement.

Did you spot the photobomb in the last picture?  Chewie wanted to say hi.

We planted three blueberry bushes in some planter boxes Lee made this year.  The one on the left and the one on the right are the same breed.  The center plant is a different breed for cross-pollination.  The bush on the left has been struggling, but it seems to be coming back to life.  The middle plant is probably the youngest, and it's quite small, but it has some gorgeous looking berries growing.  The one on the right has been growing quickly, and it has lots of berries too.


This plant was here when we bought the house.  We were planning on pulling it out as Lee's parents want the oak tree that's growing through it, but there are berries growing and ripening on it.  Any idea what kind of plant this is?


We were given this hanging basket during the spring, and had it hanging in the front yard for a while, but it was dying out.  I moved it to the back yard to get lots of sun and watered it well.  It seems like every day there's a new color coming back out.  It started with leaves growing off of some dried up looking branches, then the purple flowers came out.  The red flowers came next, and now there are yellow flowers sprouting.  The center still looks a bit bare, but it's on its way back to it's original state.


At our old house, we had a small round trash can with a lid that had holes drilled through it as a compost bin.  It worked pretty well, but was challenging to mix.  Lee and I looked online for different types of compost bins to try this time, and came up with a plan for one with interlocking boards.  This way the bin size can be scaled based on our needs.  This bin's compost will be used next year for the blueberry bushes and any other foods that I grow.  This bin is filled with food scraps, compostable household items (like paper towels and toilet paper rolls), lawn clippings, and sawdust.  We also have a bin near Chewie's section of the yard that will be used to fertilize the flowers.  That bin has her waste, lawn clippings, and sawdust.