Sunday, September 6, 2015

Laundry Cabinet

One of the reasons that I got into wood working was to make cabinets or other furniture that's of a higher quality than you can purchase and at a reasonable price. Anyone who has shopped for kitchen cabinets knows what I'm talking about. 

Stacey wanted a laundry cabinet with room for baskets and a work surface for folding clothes. This beats having to take the laundry to the living room to fold so I was on board. 

Materials:

  • 2 - 4'x8'x3/4" sheets of plywood (I like the Birch but pick your favorite)
  • 1 - 4'x8'x1/4" sheet of plywood
  • 14 - 2"x4"x8' boards
  • 6 - drawer pulls
  • 6 - pairs of drawer slides
  • Wood Glue
  • 42 - 1 1/4" pocket hole screws (coarse)
  • 78 - 2" drywall screws
  • 4 - 2 1/2" screws to extend the drawer pulls (you'll see why later)

Tools
  • Drill
  • Clamps (helpful not necessary)
  • Countersink bit
  • Miter Saw
  • Router with 1/4" straight bit and 3/8" round over
  • Table Saw
  • Kreg Jig
  • Bandsaw or Jigsaw (optional)
  • 18 gauge Brad Nailer
I started the process for building this cabinet by putting together the frames to hold the baskets. I cut all my lumber to the correct lengths. 
For my baskets I just flipped them upside down and placed some pieces on the rim to measure how big they needed to be. 

I started by screwing the pieces together from the ends since the drawer front will cover the 2"x4" ends. If you lumber is dry it might crack on the ends when you put the screws in. This is where the countersink bit comes in. Just pre-drill and countersink your screws and you'll have no problem.

If you have clamps it makes it a bit easier to assemble the frames.

Here we are with all six frames made.

The next step was to measure and cut the panels to make the cabinet out of. I had a hell of a time cutting the bottom piece correctly, luckily I had some extra wood to use. When you calculate the length of the bottom, it needs to account for the drawer slides and the center panel to divide the cabinet, plus the length of two basket frames. When you add in your drawer slides it should be 1/2" plus 1/32" for each slide. When you do the math it should add up to 2 1/8" for 4 slides plus 3/4" for the center piece which is 2 7/8".

I also cut the sides and center panel here. The width is the same as the bottom for the two sides. The center piece should be 1/4" less to account for the sheet of plywood that will be the backer.  I also cut some pieces to brace the cabinet and for the top to screw into, you can see them in the next picture.

I used my Kreg Jig to make pocket holes in the base on both ends and the middle on the top and bottom as well as the top supports. If you don't already have a Kreg Jig it is well worth the investment if you plan on doing a few projects that might use one. I've used it on about 6 or 7 projects and even had my brother and my dad stop by to use it.

Here we have the cabinet all screwed together. I had Stacey help me to make it easier. If she wasn't around I would have used clamps to hold the pieces together. At this point, I put the basket frames in and measured again to make sure everything was going to fit. Lo and behold I was off about 1/16" on each side (womp womp).

I decided to take the end pieces of the drawer frames and plane them down a bit. Since I had them taken apart I put some nice handle curves in to make it easier to get the baskets in and out. This is where I used my bandsaw, you could use a jigsaw or not cut them out at all. Its totally up to you and your preference. It did make it a bit tougher to route a 3/8" round over on the sides.

Here you can see the round over on the frames. They came out really good. After I sanded them up a bit they were ready for prime time.

Here is a learning opportunity. I used a router to cut in a 1/4" rabbet on the back of the cabinet for the plywood. If I had to do it again, which I'm sure I will at some point, I would use my table saw with a dado stack.

Back on topic, I used glue in the rabbet with 5/8" brad nails and an air nailer to secure the back. Make sure that you cabient is square before nailing the back on.

Now its time to install the drawer slides. I've watched some videos on-line to see the best way to install them. I've also got a lot of experience opening drawers. I started by taking the frame for the basket and zip tying it in place on the basket. Then I put a spacer below the basket and put it in place in the cabinet to see where the slides needed to be. I marked a line and then measured it, it was very close to 6" so that's what I went with.

The two pieces of wood under the slide are 6" spacer blocks that I cut on my table saw. You want to position the drawer slide in the closed position all the way to the front of your cabinet. Then open your drawer slides and screw the slide to the cabinet. I didn't want the drawer slides to move when I put the screws in, so I used an awl to make a divot for my screw to be perfectly centered.

After you get the slides mounted to the cabinet you need to attach the frame. Fully extend your drawer slides and then you can align the frame to the slides. I used clamps here to get everything where I wanted it before screwing it into place. It is much easier to do with two people if you have someone to help you out, but it is manageable with one person.

After I got the slide and frame screwed into place I put the basket in to see if it would work, and it worked like a charm. As I stated above, I haven't installed any drawer slides before let alone soft close ones. These installed really easily and the soft close works great.

To figure out your spacing for the rest of the drawer slides you just need to do the same thing you did earlier. Take a spacer and put it on top of your basket and then put a basket and frame on top of that and draw a line. Mine came out to be about 9" so thats what I went with and I also cut wood spacers for that. The 9" spacers will now sit on your first drawer slides and you can set your drawer slide on it to mount it to the cabinet.

I had a problem where the spacers would not stay vertical and hold the slide. I used some double sided stick tape to hold it to the cabinet. Nothing too strong, I had some left over tape from the clear window plastic you put up on windows in the winter.

The next step after you get all of your drawer slides mounted is to cut your drawer fronts. I am using the same plywood that the cabinet is made out of. Stacey likes the layered look of the plywood when it's rounded over, and I just can't justify the cost of buying solid wood for the drawer fronts. Not yet at least.

You want to start out by cutting your drawer fronts a bit oversized and cutting them down to get the perfect fit. I took a 1/8" spacer and placed it under the bottom drawer fronts and used a 1/16" spacer between them. Once I had them in place I marked the outer edge with a pencil and cut that line on my table saw. I did the same for the top. I made sure that the drawer on top with a basket in it would clear the top of the drawer front, noted the height and made the cut.

You pretty much follow the same steps going all the way up. I also put a 1/8" spacer on the top to make sure the drawers would not rub on the top of the cabinet once it was in place. I think its starting to look like an actual cabinet at this point.

Now I unscrewed all of the drawer fronts and put a round over on the edges. Be sure to test the round over on a test piece of wood. If you get your cut too deep you can get what I call a shelf carved into your wood and have to sand it off, unless that's the look you're going for. You can see if in the figure to the left the front is what I like on my round over pieces but if your router depth is set to far you will get the one in the back.

I used the Minwax Provincial stain on the cabinet. Stacey and I both like the dark color. It brings out the grain in the Birch plywood really well.


I let the stain sit on the boards for about as long as it took me to stain the next board then wiped off the previous one. Stacey took a nice contrast photo here to show the difference. The longer you leave the stain on the darker the color would be.

Now that everything is stained, it's time to put the drawer fronts back on. I used a clamp to hold them in place and countersunk five screws into the boards from the back of the 2"x4"s.

Here is the cabinet with all the drawer fronts on. 

The next step was to put on the drawer pulls. I used the guide on the right to get the spacing correct. I measured the width of the drawer and then found the halfway point and put the guide in the center. I marked where the two holes should be and then pre-drilled them before putting the screws in from the back. The way the spacing came out for the drawers meant that the bottom four drawers went through the 2"x4"s while the top two drawers only went through the plywood.


At this point the cabinet is done, CHECK! Next up was the counter top. 

I cut eight 2"x4"s down to length and then ripped them in half. I happened to be lucky enough to have just the right number of clamps to let me glue up both halves of the top. I did this in two pieces so that I could run them through the planer after. After I planed both halves I glued them together. 

The top is 24" deep and 59 1/2" wide. Only being 24" deep it fit on my cross cut sled and I was able to cut off both ends. Then I used my circular saw to square one long side to the edges.  After that I was able to run it across my table saw with the fence on and I had a nice square top. I gave it a good sanding up to 220 on the top and 150 on the bottom.

Since the cabinet is going into the corner of the room I gave the front a double round over (top and bottom) and a round over on the top right side but not the bottom.
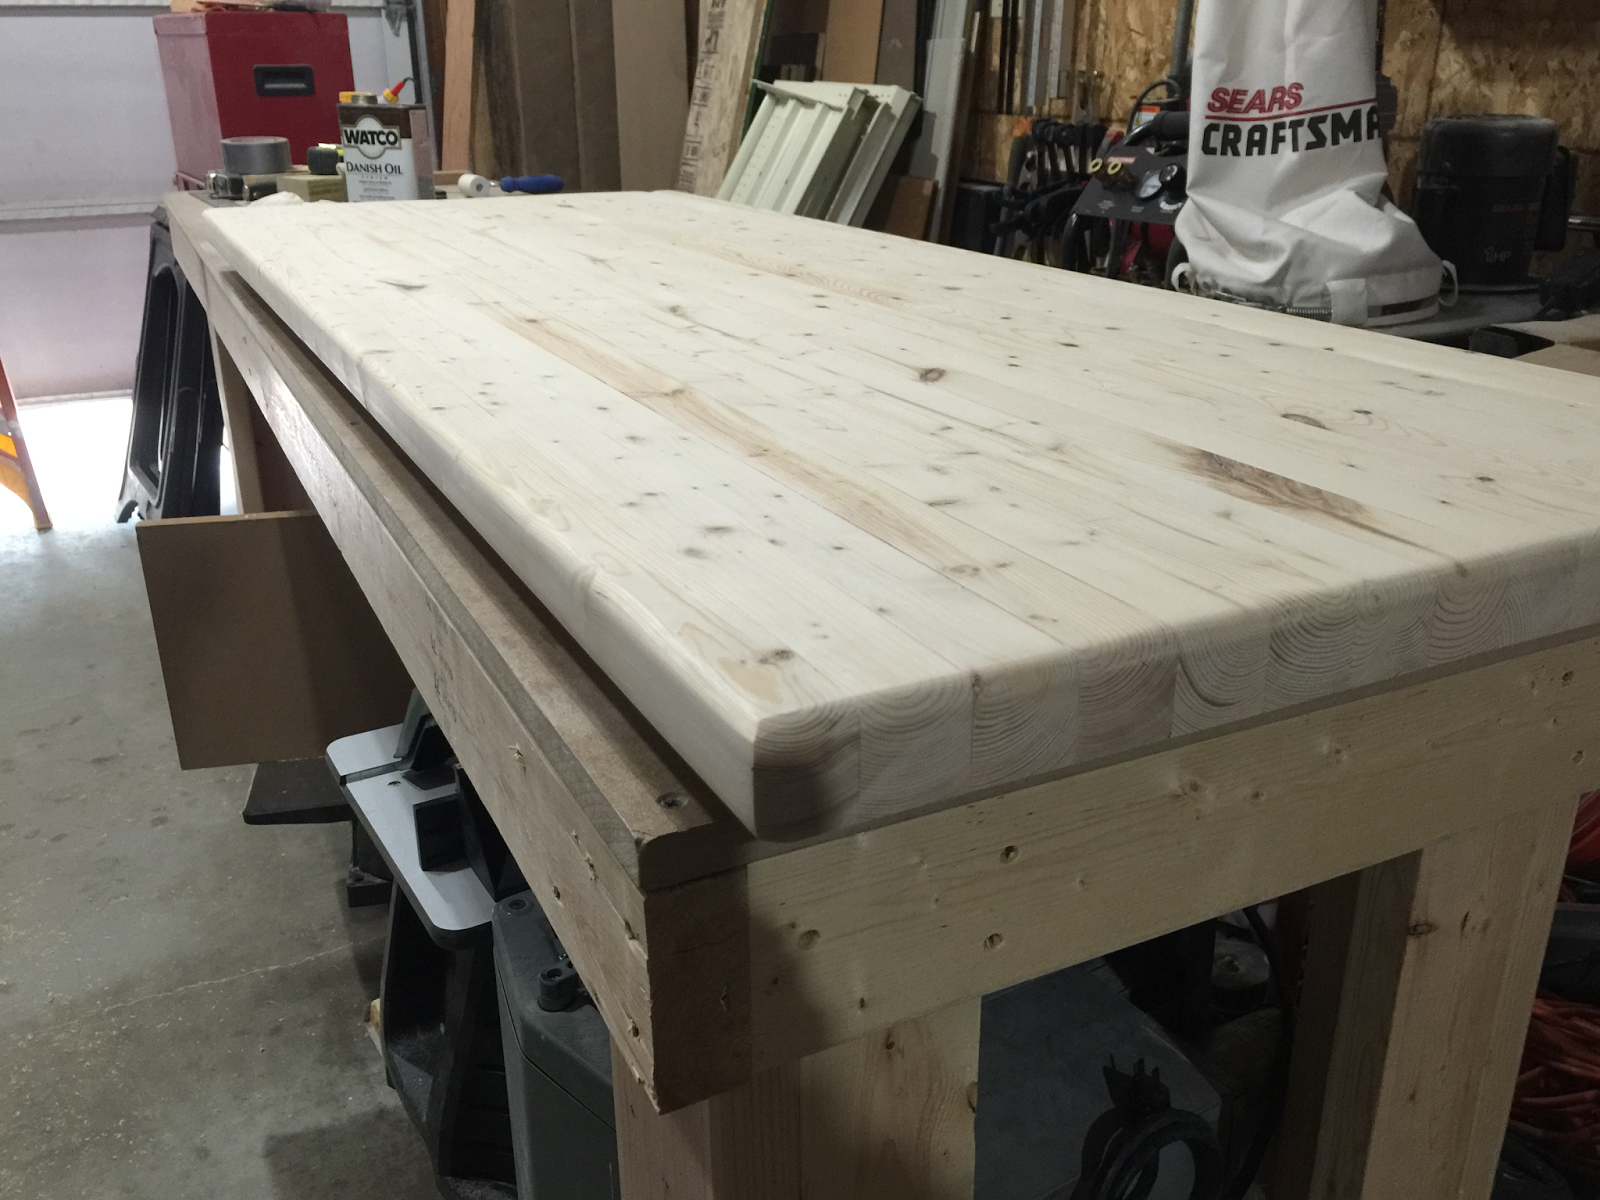
I used Danish Oil on the top, then it was put on the cabinet.

Here is the finished cabinet.


Sunday, August 30, 2015

Chewies Bad Girl Fence

Currently we have a sort of vestibule setup for our dog doors to keep the house warmer in the winter. For the dog to get outside she needs to go out of the kitchen into the 3 seasons room and then from the 3 seasons room she can go outside. Recently she decided it would be a good idea to use the 3 seasons room as her personal bathroom instead of going outside. Until we could come up with a solution, we decided to close off the dog doors and we were letting her out ourselves. For anyone with dogs, they know this is a hassle. You have to come home at lunch and right after work to let the dog out which can put a damper on spontaneous outings.

Stacey and I both thought a small railing that would limit her space in the 3 seasons room and only let her go the short distance from one door to the other would be the best option. We are also rewarding her with treats when we notice that she does go outside to use the bathroom to try and use the railing as a temporary solution until the positive reinforcement takes hold.

I made a railing similar to this for our old house to replace a 70's red twisted metal railing they had that was super sketchy. At the time I did not take any pictures or write up an article on it so this is kind of a dual article since the railing is almost identical. I got the idea to make the railing from Stacey after we looked at the prices of making a traditional railing at Lowes and decided to look online for cheaper methods. We found this post that had a nice looking 2"x4" railing and decided to use it.

Materials
  • ~10 - 2"x4"x8' 
  • 44 - 2 1/2" Kreg Jig Screws

Tools
  • Miter Saw (or circular saw)
  • Table Saw
  • Kreg Jig (can do it without just not as easy)
  • Clamps (makes it easier)
  • Drill
  • Router 
  • Orbital Sander 

This is the first project I used Sketchup for the design. I figured it would help me get the right number of spindles and make it easier to cut the pieces. I was half right, we'll cover that later on though. If you want to download the file it is available here.

I started by cutting my pieces down to length. Two boards for the long top and bottom, then three for the vertical support, and two more for the short top and bottom section. The remaining pieces are for spindles, I had seven spindles left over from the first railing but needed seven more.

Take the 2"x4" boards to be spindles and cut them in half with your table saw. Be sure to have a splitter in the back to keep them from pinching the blade. It often happens to me when ripping 2"x4"s.

After you have your spindles cut it is time to round over the edges. After ripping your spindles on the saw they will be a bit rectangular, which is fine. I have been trying to figure out a way to explain this that will be easy to understand for a couple days. Stacey liked this description best, so hopefully it makes sense. 

The round over, if set to the perfect height, will allow you to route all four edges of the spindle however you would like. If you have your router bit set a bit to low,  you could end up with some sides of the spindle not being symmetrical. In order to account for this you need to route the edges in a certain order. If done correctly only two sides of the spindle should touch the router table. 

Looking at the end of the spindle we will call the longer sides the top and bottom, those are the two sides that you should have touch the router table. You want to route edge 1 and then rotate (roll) the spindle to the other side and route edge 2. After having 2 edges done flip the spindle end over end and then do the same steps for edges 3 and 4. Make sure to only route from the top and bottom side.                                                                                                                                       If you route the edges and roll the spindle you could end up with something similar to the bottom figure. 


It's time to drill pocket holes if you have a Kreg Jig or other pocket hole system. All of the spindles get two pocket holes, one on top and one on the bottom. I know it sounds obvious, but make sure they are on the same side and that you are using the same side on each of the spindles. As I stated earlier they are not square.

The two end pieces and the center piece each get two holes at what will be the top. The short bottom piece gets two pocket holes on one side of both ends and the top short piece gets two pocket holes on one end. The bottom long piece will get two pocket holes on one side of both ends and the top long piece will get none.

I have a 4" spacer block clamped to the bottom of one of the vertical pieces and then the long piece clamped to the vertical piece at the other end. The spacer block is used to keep the height of the bottom of the railing consistent from one side to the other. I chose to go with 4" since it was the max allowed when I looked up the regulation on hand railing for stairs. If you don't have clamps, it's okay, just hold the pieces in place best you can when you screw them in. I was about to put the top piece on when I realized I did not have enough measurements on the diagram. The diagram was accurate but I did not cut the two bottom pieces correctly. The long bottom piece needed 3" removed and the short bottom piece needed 1 1/2" removed, and then I had to re-drill the pocket holes.  Don't worry, the file linked above has the added measurements.

After the pieces were re-cut and re-drilled. I was able to assemble the frame. Before routing a round over onto the top handrail I sanded the whole thing down to 100 grit. This isn't going to be used near a stairwell where people will be grabbing or sliding their hands on the handrail. If it were going to be I would have sanded it down to 220 grit.

A good tip that I picked up from the other site was to measure the center of your railing and install your spindles going out from there. This will ensure that you have equal spacing on both sides when you get to the end. I was using a 5" spacer block so I centered that on the center of the long board. I am only using a 5" spacer because its not a fixed railing. If it was going to be a railing near a stairway that is attached to the floor I would have used a 4" spacer to meet building codes. I also have two spacer blocks underneath the spindle to keep it centered on the 2"x4".

I was only screwing in one side at a time. I would do all of the spindles on one side and then switch over to the other side with my spacer blocks and do the rest. After you get the spindles installed you are pretty much done.

This last step is optional. If you like the way it looks here you can add a 1"x4" pine board at the top and bottom to hide the pocket holes. I used an air nailer with 1 1/4" nails to secure the boards. I covered the pocket holes for the stairway railing, but left Chewies fence without.


Sunday, August 23, 2015

Compost Bins

One of the things we tried to do at the old house was composting. It didn't really work well since we couldn't keep the compost pile warm enough. Getting sunlight all day in our new backyard, we decided to step up our compost game. Stacey and I looked for something that would be cheap enough to get started and large enough to accommodate all of our compostable materials.

We planned on composting not only our grass clippings and food waste but dog poop as well. Since we wanted to be able to use some of our compost for gardening type applications we decided to make two compost bins one for food safe use and one for general yard and plant use.

Materials: 
  • 6 - 1"x6"x12' pine boards
Tools: 
  • Miter saw
  • Table saw
  • Chisel
  • Hammer
  • Clamps (helpful not necessary)
The first step was to cut the boards to length. I wanted the compost bin to be around 3'x3' in size. Having purchased 12' boards I was able to cut them into four equally sized 3' boards. The lumber was all over sized enough to accommodate this. If you don't have a miter saw you can use a circular saw instead. If you do use a miter saw I would recommend setting some sort of stop block to make cutting all of the pieces easier. You can see a piece I have clamped down at the end of my workbench. 

I was inspired by Lincoln Logs and used that as the basis of my design.

If you want to follow the math, read this section. If not, the next section will tell you the dimensions to use. Take half of the 5 3/4" wide board which is 2 7/8". Now take half of the spacing gap we want which is 1/4" and subtract that from 2 7/8" to get 2 5/8". Lastly, since we will be having two boards to connect to each other we need to split this gap between both boards so half of the 2 5/8" which is 1 5/16". I've attached a diagram to make it a bit easier to visualize.


If you have a cross-cut sled it will make this easier, but if not you can still do this with your miter gauge. You want to make two cuts a little bit larger in width that the width of the boards so that they will be able to stack together. The depth of the cut assuming your boards are 5 3/4" tall should be 1 5/16". This will give you a 1/2" gap when you stack your boards to allow for airflow. The cuts should be in about 1 1/2" in from the end. We want to leave enough material there so they don't break from pressure. Make this cut on both sides and the top and bottom.

When I made the first compost bin I used my bandsaw to cut out the holes and they went together a bit tight and broke couple of the ends off. The table saw provided a much better cut that was more consistent and the assembly went much better as well.


This is the fun part. Get our your chisel and hammer, ITS HAMMER TIME! You want your chisel to be around 3/4 inch wide. If its a little under its okay, the pieces should pretty much pop out.

You will want to rip a board in half as close as possible as you can get to half, making sure you account for 1/8" of an inch for the kerf of the blade when you cut this. The kerf does not refer to the width of the blade but the gap the blade leaves behind it in the wood, I didn't know this until I started woodworking. We need these two pieces to be able to stabilize the base when building the compost bin.

After cutting all of the pieces I put the compost bin together in my workshop to see how it fit. Everything went together pretty good. After that I had Stacey help me carry the bin out to the backyard where we filled it up.

You can see the compost is pretty dark already. That is just two week old grass clippings and food waste.

I try to mow my lawn every two weeks and I have been bagging the clippings and dumping them in here. After I get done mowing the bin is pretty full, however by the time I am ready to mow the next time there seems to be enough room again, so I think its working.

We did buy a five tine pitch fork to help mix the compost. It is much easier to do with that than with a shovel or hoe.


Sunday, August 16, 2015

Planter Boxes

Living in our new house has been GREAT. Not only is our commute to work five minutes, but our backyard gets sun all day long. We have tried to grow tomatoes and bell peppers in the past but at the old house there just wasn't enough sun. This year we purchased a few blueberry bushes to add to the backyard and decided to build some planter boxes to put them in. I am building three planter boxes, one for each bush. 

Materials:
  • 5 - 1"x6"x8' pine boards
  • 1 - 2"x4"x8' boards
  • 84 drywall screws 1 1/4" long
 (You could use 2 - 2"x2"x8' boards if they look okay. I can never seem to find any that are not twisted at my local lumber stores.)

Tools:
  • Miter Saw (Circular saw would work)
  • Table saw (Don't need this if you get 2x2s)
  • Drill (if you have two of them it will make things easier)
  • Router with 3/8th round over bit (not necessary but recommended) 
  • Clamps (not necessary but makes things easier)
  • Countersink bit
  • Tape measure
The first step is to cut the lumber to length. Take four of the 1x6x8 boards and cut each board into four equally sized pieces. Most of the boards I had purchased were a bit over sized and I was able to cut them down to 2' pieces. Some of the boards were not quite as long and came up a bit short on the last piece. Since the saw blade is 1/8" thick and you will be making 3 cuts you would need your boards to be at least 3/8" oversized. I would recommend that you check the length of all boards before cutting. 

The next step is to cut the 2x4s to length or the 2x2s if that's what you purchased. The length of the 2x4s needs to be the height of four stacked 1x6 boards which should be approximately 23". If you have 2x2s move on to the next step. If you have 2x4s then you need to also rip them in half. Make sure you have a riving knife or splitter on your table saw if you are ripping 2x4s. They almost always seem to pinch and bind the blade if you don't. 


This step is where having two drills will come in handy. I had my countersink bit in one drill and a Phillips bit on the other. Take one of your 2x2 pieces and layout your 1x6 pieces on top. I put a second piece at the other end to keep them flat. Countersink your holes and make sure the drill bit goes all the way through the 1x6 board, we don't want any splits or cracking to take place.

After you countersink your holes it's time to begin assembly.

For this next part my workbench came in handy. I was able to pull the finished side down and work on the next side. I put this side and the next together the same way as the first. Countersink your holes and then screw down the boards.

The last connection to finish the box was the tricky one. As you can see it took me a couple clamps to get this where I wanted it. If you don't have any clamps try and see if someone is around to give you a hand.

After you get your sides all put together its time to work on the bottom. I took the remaining four 2x2s and cut them to length to fit in the box and then screwed them in flush with the bottom of the box. Again make sure to countersink your screws, I put three in each board.

For the inside board cut the final 1x6 board down to the right width and the notch the corners. You can do this with a jigsaw, table saw, band saw or hand saw. I countersunk two screws on either end of the boards with some space in between each board to let water drain through.

I don't really feel like a project is finished until I've gotten out the router. I don't know what it is but a round over bit seems to have a magical transformative effect on a project for me. Well anyways, I used a 3/8" round over bit on the inside and outside of the top edge. It came out really well. 

Lastly. we planted blueberry bushes in all three planters in our backyard. The blueberry bushes have even sprouted some berries that Stacey said are delicious. In the past we thought we just weren't good at keeping plants alive, but after moving to this house we have determined that we just didn't have the right environment for it in the past. 

If you made it all the way down here please leave us a comment and let us know if you like the post, or have any feedback on the planter boxes.

Sunday, August 9, 2015

Curtains: Take 3

Okay, I know I said that there wouldn't be a Curtains: Take 3, but I want to share my most recent attempt at curtains.


These took about an hour and forty five minutes for each panel, which probably isn't really great, but it's way better than the three weeks my earlier attempts took.  I'm just a little bit proud of myself right now.  We'll see what kind of trouble this new-found confidence gets me into.

Sunday, August 2, 2015

Curtains: take 2

Alright, I'm moving on to the laundry room windows.  I took a lot fewer measurements, and no actual calculations.  Kinda feeling it out this time.  Adjusting things based on how the bathroom curtains came out.  So not me.  Still have numbers in the spreadsheet, but mostly just because I needed somewhere to put my measurements and I didn't have a notebook handy.  Well I had my laptop, which are often called notebooks by manufacturers and resellers, but I digress.

I feel the need to share some of my earlier crazy.  Don't judge.

Compared to my new process:

I was so overcomplicating things.  Anyway, on to the good stuff.

The Plan: (yeah yeah, baby steps)
  • Press fabric (its already been washed)
  • Measure and cut
  • Sew side seams
  • Press top 1"
  • Mark where the curtain rod line should be: 6.5" from top since 1" is folded down
  • Pin in place
  • Test on actual curtain rod
    • Adjust as necessary
  • Sew when it works
    • Update measurements for next curtain based on new knowledge for how I want the tops of my curtains to look
  • Hang curtains
  • Determine where I want them to end
  • Pin/clip in place and press
  • Measure 3" down from fold, cut off excess fabric
  • Fold bottom inch, then at fold
  • Sew
  • Criticize work and begin Curtains: take 3
How it actually went down:
  • Pressed fabric
  • Squared, measured, and cut (I did not cut off the selvedge edges.  Gasp!)
  • Sewed side seams
  • Pressed top 1"
  • At this point, the plan fell through.  It didn't look right.  So I fiddled with the fabric and pressed the top 1" again.  Still didn't like it, so I made the bottom the new top.  Pressed the new top 1" again, and was good with it.  Yay, back to the plan.
  • I measured 6.5" from the top, folded the top to that point, and tried to get the curtain rod through.  No go.  So I measured and drew lines at 7", 7.5", 8", 8.5", and 9".  7.5" fit but was snug, so I decided on 8" to fit over the end caps.  I matched up the top with the 8" line and pressed.  I picked up the fabric to bring to the sewing machine, looked at it, and didn't like it.  More measuring and pressing ensued, followed by me giving up for a while.  By a while I mean two weeks.
  • When I finally got back to it, I tried to square up the fold line for the top 1", using a bunch of Lee's woodworking squares and his straight edge.  The amount of fabric in the top 1" varied a bit, but once folded on the line I made, it looked straight.  I then measured 8" from this line and pressed the top down to that point.  I clipped the edges, held up the fabric and was happy enough with what I had.  I sewed the edge down to make the rod pocket and hung up the curtain.  It looked good.  
  • At this point I had enough confidence and attitude towards curtains that I surged forward with the second panel.  The fabric was pressed, squared, measured, and cut.  The side seams were sewn down.  I squared up the side and measured 1" which was marked on the left and right sides.  Those markings were used to draw a line across for folding.  This process eases my mind so much and gives me the confidence to continue.  I told Lee I want my own square an straight edge for my birthday.  :)  
  • The fold was made, then a line was made 8" below, which was again folded to, pressed, and sewn.   The curtain was then hung up next to the other.  
  • The curtains were hemmed, with a much smaller hem than the first pair of curtains.
  • As for Curtains: take 3, I don't think it's necessary.  Granted, if I start overcomplicating things again, it may happen.  I'm pretty comfortable with the process now, and don't expect any further issues.