Sunday, September 27, 2015

Workbench Add-on for Cutting Sheet Goods

One thing that I've struggled with since starting woodworking has been working with full sheets (8'x4') of plywood. Not only is moving them around and storing them tough, but cutting them is a pain as well. I don't have a cabinet style/size table saw that can safely cut full sheets, which leaves me using a circular saw to cut them. 

I looked into the problem on some forums and some people use their table saw while others made 8'x4' tables out of 2"x4"'s and just left it outside to cut full sheets on. 

I have already used my mobile work bench outside to cut full sheets of plywood, but its a bit cumbersome and requires two people to safely make cuts. What I decided to do was to build supports that can go on top of my workbench and extend the top to 4' wide. It also provides some depth so I don't cut into the workbench.

Tools:

  • Miter Saw (circular saw is fine too)
  • Drill
  • Countersink Bit

Materials:
  • 3 - 2"x4"x8'
  • 16 screws at least 2 1/2" in length
  • Mobile Workbench

I started by cutting two 2"x4"'s in half and cutting eight 6" blocks out of the third board.

Next I clamped one of the 6" blocks to the bench flush with the top and then set the 2"x4" across the top. Make sure to center the 2"x4" on the workbench. With the board centered, pre-drill some holes in the top to keep the board from splitting when you put the screws in. 

After you screw in one side its time to do the next.

Repeat the process a few times and you will have a good set of supports for cutting full sheets.

With these supports I was able to cut down four sheets of 3/4" plywood myself, and did not have to worry about the board pinching the blade or falling. 

As you can see in the picture below I've cut through the 2"x4" supports quite a few times, this isn't a problem now, but eventually if I cut through them too much and the plywood doesn't sit flat I will have to replace them. They are only rough construction lumber so the cost is very inexpensive. Also when making cuts make sure you remain aware of where the screw head are so that you do not wreck your saw blade. 

Sunday, September 20, 2015

Raindrops

My mother-in-law recently planned a baby shower for my sister-in-law.  She found this adorable raindrop/balloon window decoration on Pinterest.  Here's her final Pinterest-inspired product.

To make the raindrops easily and consistently, we used our Silhouette Cameo.  Lee found an adorable cloud and raindrop design called Cute Rain Cloud in the Silhouette store.

We bought the pattern, enlarged a raindrop and cut out a bunch on pastel cardstock, minus the pink.


The original Pinterest project looked like it had a streamer between each column of raindrops, but I think this came out really cute without them.  There were some extra rain drops that were taped to the other windows as well.


Sunday, September 13, 2015

Pallet Desk

One of the things that I have been needing to do since we moved was to make Stacey a new desk. In the old house we had a couple desks that were from Staples which were good enough but not worth taking apart and moving to be re-assembled again. 

I bookmarked a post when I first started wood working and thought 'one day I will have the tools and time to do this'. Well, the time has come and I have the tools. See original post here.

Here are the Tools, Materials and steps involved.

Materials:
  • 7 Pallets*
  • 2 - 2"x4"x8' boards
  • 4 Bolts 1 3/4"
  • 4 washers that fit the bolts
  • Glaze Coat (enough for your surface, see box for details)
  • Danish Oil (or your oil/stain of choice)
  • Wood Glue. Lots of it.


*Depending on the size of your table and how many good boards are on the pallet you could need quite a few. I ended up using about 7 pallets worth of lumber.

Tools:
  • Thickness Planer
  • Table Saw
  • Circular Saw (can just use the Table Saw if you don't have one)
  • Clamps, lots of clamps
  • Orbital Sander (80 - 220 grit paper)
  • Forstner bit (big as the washers if you have one, if not, no big deal)
  • Socket and wrench to screw in the bolts
  • Kreg Jig for pocket holes (off brand pocket hole system would work fine too)
I am not going to cover how to take a pallet apart. If you need help with that step head over to youtube, they have tons of videos with different methods for this. Just pick the one you have the tools for and seems like it would work.

Here you can see the starting pile of boards I have taken from pallets. Some are longer than others and that's fine. We want our surface to have lots of different lengths for the boards to be unique.

I have a long board that runs through my planer to allow me to feed work pieces in easier without having to worry about snipe. If you want to learn about snipe head over here, but basically, if your boards don't go in flat, the end can get planed deeper than the rest of the board.

You can't see it, but I also have my planer screwed down to my workbench so that it doesn't try to move while I'm using it. Although I emptied my dust collection system before starting this, I ended up filling the entire bag with wood shavings from the planer. I didn't realize it until the shavings started to pile up at the end of the planer. I was almost done anyway so I just let it keep piling up.

Here are all the boards planed up to the same thickness. They look like really nice boards and I've got a good variety of wood types too.

The next step is to start ripping your boards down to the correct width. Use your table saw to cut them at 1 1/2". You should get two pieces out of most of your boards. With the short boards you can use your table saw fence to trim off one side to have a nice straight edge and then flip it over to cut off your two pieces. 

The longer boards will curve a little since your fence isn't long enough to keep the boards straight. If you have a jig that you can clamp the board to to rip a side off it first that would be best. I didn't really notice until I started to glue them all up that the long pieces weren't flat.

Its not a deal breaker if you don't have a jig for this, you'll just have a bit more to plane off after you glue your boards together.

Lots of nice wood here all lined up like good little soldiers. 

Sometimes when I get into a groove I forget to take lots of pictures so you'll have to bear with me if this seems like a lot of text.

The overall desk top I was putting together was to be 32"x46". Now, I can't get something that big through my planer and I'm not a big fan of endlessly sanding. So the alternative is to glue up the desk in sections. I made three sections at 11"x46". I laid out all of my pieces and clamped it all together without glue and trimmed the edges off (that one I have a picture for). After trimming the edges, I glued it all together and clamped it up. I didn't have enough clamps to do all three sections at once, so I did the gluing over three days.

After you have all of your pieces glued together, it's time to run them through the thickness planer. It's important to note that a thickness planer will not give you a flat surface, it will give you a parallel surface. This is why some people hand plane boards before running them through a thickness planer. I do have a hand plane, though its not very good, and these boards turned out to be pretty flat already. Just take the flattest side you have and put that side down, this worked for me and the final product was nice and flat.

Okay, with all three pieces planed down here we have the final glue up. at this point I am really starting to like how this looks. It seems pretty obvious here but you will need clamps long enough to cover all three pieces or more if you are making a larger surface.

I have some Harbor Freight clamps on the bottom and some clamps I "borrowed" from my father on the top. If you are going to invest money into clamps to try and do something like this I would recommend you go with pipe clamps. They run between $10 to $15 for 3/4" clamps and about $12 for a 4' pipe. The benefit with pipe clamps is that you can get a coupler and make an 8' clamp really easily. I've had to do this for another project I'm working on and it is handy.

I sanded the table down to 220 grit and put a 3/8" round over on it. The table looks fantastic and Stacey was pretty happy with it at this point as well.

I'm not sure what it is, but this is the part of woodworking I like best. To be fair, it is really nice when everything you cut fits together as well, but putting stain or oil on a piece of wood has such a gratifying feeling. I am using danish oil for the table and it really brings out the color in the wood.

Stacey came out to take some pictures and watch the transformation occur.


Here it is all oiled up. I put on a few coats to make sure the wood was nice and protected. I will be putting a Glaze Coat on the top and sides but the bottom will remain as it is so I made sure to give all sides a few coats.

Moving on to the legs for the desk, I used a couple 2"x4" pieces I had laying around to make the legs. I cut them a bit longer than I needed and glued them together. After they glue dried I put a round over on all the vertical edges and cut the bottom off flush. 

To mount the legs to the table I made a couple skirts that get pocket hole screwed into the desk. I used dowels and glue to put the skirts together. After the glue dried I put a round over on the edges so you wouldn't get hurt if you bumped into it with your legs. Next, I drilled a couple holes with a forstner bit deep enough for the washer and head of the bolt and another bit a little smaller than my bolts to secure the legs to the skirts. Keep an eye out for smaller sized pallets, that's where I found the oak that the skirts are made out of. 

The lighting isn't great but you can see the bolt head is recessed to be flush, or just below the surface of the skirt. 

The last step before putting it all together was to glaze coat the top of the table. We have had a desk in my family for 15 years that we coated with a similar product and I still use that desk today. This stuff is basically a clear hard plastic coating. I ended up using two boxes of this stuff on the new table. Make sure that you read and understand the instructions that come with this before you give it a try.

I don't think I really needed to use both boxes of this but I wanted a nice thick coating on the table and had quite a bit of spill over. 

Here is a picture of the desk all put together. For the assembly we mounted the skirts for the legs using the pocket holes. Then secured the legs with the bolts. We are only using legs on the right side of the desk. The left side is being mounted to a filing cabinet. 

I took a 2"x2"x24" piece of wood I had in the garage and secured it to filing cabinet with screw from inside of the filing cabinet. I also took a long strip of thin wood I had left over from making the top and used that on the inside of the filing cabinet since the wood is only particle board I wanted something a bit stronger to hold the desk. After securing the filing cabinet side to the 2"x2" I got under the desk and put a few screws into the desk to hold it in place. 

And here is Chewie, acting like people. Let's just hope she doesn't figure out how to use the internet while we are at work. The last thing we need is more dog toys showing up from Amazon.

Sunday, September 6, 2015

Laundry Cabinet

One of the reasons that I got into wood working was to make cabinets or other furniture that's of a higher quality than you can purchase and at a reasonable price. Anyone who has shopped for kitchen cabinets knows what I'm talking about. 

Stacey wanted a laundry cabinet with room for baskets and a work surface for folding clothes. This beats having to take the laundry to the living room to fold so I was on board. 

Materials:

  • 2 - 4'x8'x3/4" sheets of plywood (I like the Birch but pick your favorite)
  • 1 - 4'x8'x1/4" sheet of plywood
  • 14 - 2"x4"x8' boards
  • 6 - drawer pulls
  • 6 - pairs of drawer slides
  • Wood Glue
  • 42 - 1 1/4" pocket hole screws (coarse)
  • 78 - 2" drywall screws
  • 4 - 2 1/2" screws to extend the drawer pulls (you'll see why later)

Tools
  • Drill
  • Clamps (helpful not necessary)
  • Countersink bit
  • Miter Saw
  • Router with 1/4" straight bit and 3/8" round over
  • Table Saw
  • Kreg Jig
  • Bandsaw or Jigsaw (optional)
  • 18 gauge Brad Nailer
I started the process for building this cabinet by putting together the frames to hold the baskets. I cut all my lumber to the correct lengths. 
For my baskets I just flipped them upside down and placed some pieces on the rim to measure how big they needed to be. 

I started by screwing the pieces together from the ends since the drawer front will cover the 2"x4" ends. If you lumber is dry it might crack on the ends when you put the screws in. This is where the countersink bit comes in. Just pre-drill and countersink your screws and you'll have no problem.

If you have clamps it makes it a bit easier to assemble the frames.

Here we are with all six frames made.

The next step was to measure and cut the panels to make the cabinet out of. I had a hell of a time cutting the bottom piece correctly, luckily I had some extra wood to use. When you calculate the length of the bottom, it needs to account for the drawer slides and the center panel to divide the cabinet, plus the length of two basket frames. When you add in your drawer slides it should be 1/2" plus 1/32" for each slide. When you do the math it should add up to 2 1/8" for 4 slides plus 3/4" for the center piece which is 2 7/8".

I also cut the sides and center panel here. The width is the same as the bottom for the two sides. The center piece should be 1/4" less to account for the sheet of plywood that will be the backer.  I also cut some pieces to brace the cabinet and for the top to screw into, you can see them in the next picture.

I used my Kreg Jig to make pocket holes in the base on both ends and the middle on the top and bottom as well as the top supports. If you don't already have a Kreg Jig it is well worth the investment if you plan on doing a few projects that might use one. I've used it on about 6 or 7 projects and even had my brother and my dad stop by to use it.

Here we have the cabinet all screwed together. I had Stacey help me to make it easier. If she wasn't around I would have used clamps to hold the pieces together. At this point, I put the basket frames in and measured again to make sure everything was going to fit. Lo and behold I was off about 1/16" on each side (womp womp).

I decided to take the end pieces of the drawer frames and plane them down a bit. Since I had them taken apart I put some nice handle curves in to make it easier to get the baskets in and out. This is where I used my bandsaw, you could use a jigsaw or not cut them out at all. Its totally up to you and your preference. It did make it a bit tougher to route a 3/8" round over on the sides.

Here you can see the round over on the frames. They came out really good. After I sanded them up a bit they were ready for prime time.

Here is a learning opportunity. I used a router to cut in a 1/4" rabbet on the back of the cabinet for the plywood. If I had to do it again, which I'm sure I will at some point, I would use my table saw with a dado stack.

Back on topic, I used glue in the rabbet with 5/8" brad nails and an air nailer to secure the back. Make sure that you cabient is square before nailing the back on.

Now its time to install the drawer slides. I've watched some videos on-line to see the best way to install them. I've also got a lot of experience opening drawers. I started by taking the frame for the basket and zip tying it in place on the basket. Then I put a spacer below the basket and put it in place in the cabinet to see where the slides needed to be. I marked a line and then measured it, it was very close to 6" so that's what I went with.

The two pieces of wood under the slide are 6" spacer blocks that I cut on my table saw. You want to position the drawer slide in the closed position all the way to the front of your cabinet. Then open your drawer slides and screw the slide to the cabinet. I didn't want the drawer slides to move when I put the screws in, so I used an awl to make a divot for my screw to be perfectly centered.

After you get the slides mounted to the cabinet you need to attach the frame. Fully extend your drawer slides and then you can align the frame to the slides. I used clamps here to get everything where I wanted it before screwing it into place. It is much easier to do with two people if you have someone to help you out, but it is manageable with one person.

After I got the slide and frame screwed into place I put the basket in to see if it would work, and it worked like a charm. As I stated above, I haven't installed any drawer slides before let alone soft close ones. These installed really easily and the soft close works great.

To figure out your spacing for the rest of the drawer slides you just need to do the same thing you did earlier. Take a spacer and put it on top of your basket and then put a basket and frame on top of that and draw a line. Mine came out to be about 9" so thats what I went with and I also cut wood spacers for that. The 9" spacers will now sit on your first drawer slides and you can set your drawer slide on it to mount it to the cabinet.

I had a problem where the spacers would not stay vertical and hold the slide. I used some double sided stick tape to hold it to the cabinet. Nothing too strong, I had some left over tape from the clear window plastic you put up on windows in the winter.

The next step after you get all of your drawer slides mounted is to cut your drawer fronts. I am using the same plywood that the cabinet is made out of. Stacey likes the layered look of the plywood when it's rounded over, and I just can't justify the cost of buying solid wood for the drawer fronts. Not yet at least.

You want to start out by cutting your drawer fronts a bit oversized and cutting them down to get the perfect fit. I took a 1/8" spacer and placed it under the bottom drawer fronts and used a 1/16" spacer between them. Once I had them in place I marked the outer edge with a pencil and cut that line on my table saw. I did the same for the top. I made sure that the drawer on top with a basket in it would clear the top of the drawer front, noted the height and made the cut.

You pretty much follow the same steps going all the way up. I also put a 1/8" spacer on the top to make sure the drawers would not rub on the top of the cabinet once it was in place. I think its starting to look like an actual cabinet at this point.

Now I unscrewed all of the drawer fronts and put a round over on the edges. Be sure to test the round over on a test piece of wood. If you get your cut too deep you can get what I call a shelf carved into your wood and have to sand it off, unless that's the look you're going for. You can see if in the figure to the left the front is what I like on my round over pieces but if your router depth is set to far you will get the one in the back.

I used the Minwax Provincial stain on the cabinet. Stacey and I both like the dark color. It brings out the grain in the Birch plywood really well.


I let the stain sit on the boards for about as long as it took me to stain the next board then wiped off the previous one. Stacey took a nice contrast photo here to show the difference. The longer you leave the stain on the darker the color would be.

Now that everything is stained, it's time to put the drawer fronts back on. I used a clamp to hold them in place and countersunk five screws into the boards from the back of the 2"x4"s.

Here is the cabinet with all the drawer fronts on. 

The next step was to put on the drawer pulls. I used the guide on the right to get the spacing correct. I measured the width of the drawer and then found the halfway point and put the guide in the center. I marked where the two holes should be and then pre-drilled them before putting the screws in from the back. The way the spacing came out for the drawers meant that the bottom four drawers went through the 2"x4"s while the top two drawers only went through the plywood.


At this point the cabinet is done, CHECK! Next up was the counter top. 

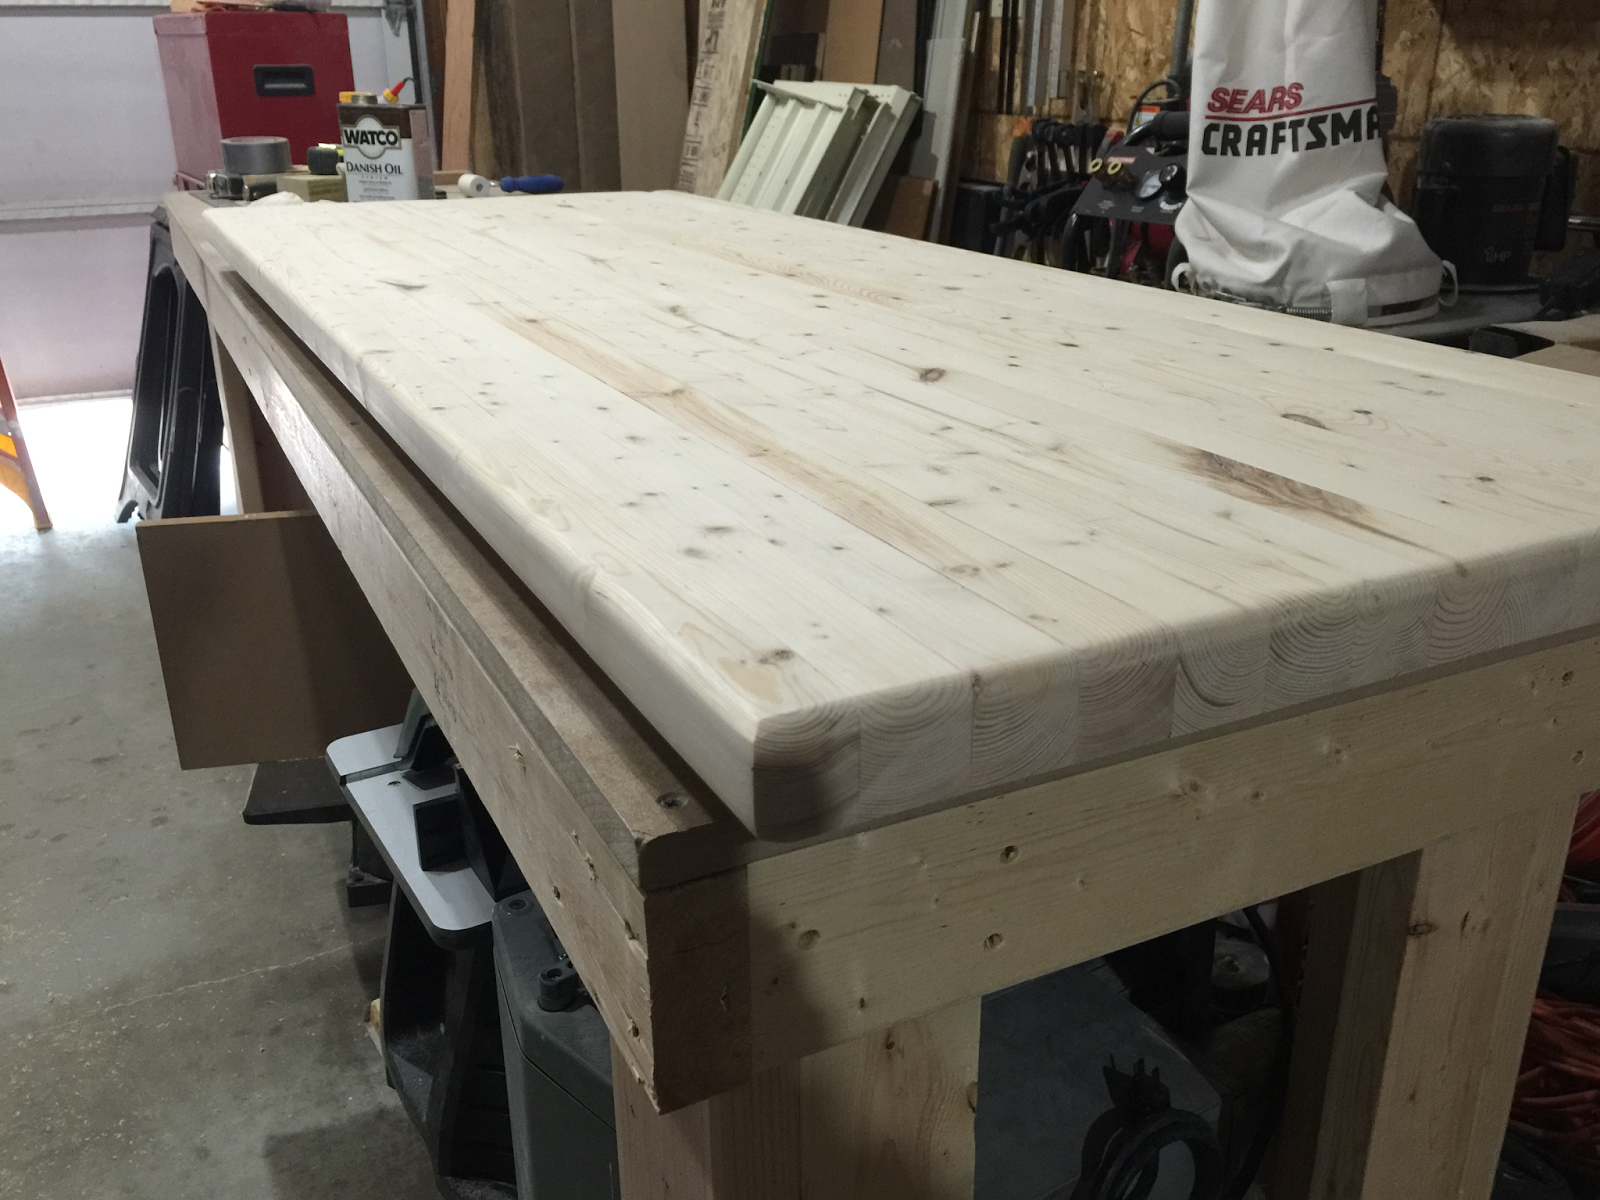
I cut eight 2"x4"s down to length and then ripped them in half. I happened to be lucky enough to have just the right number of clamps to let me glue up both halves of the top. I did this in two pieces so that I could run them through the planer after. After I planed both halves I glued them together. 

The top is 24" deep and 59 1/2" wide. Only being 24" deep it fit on my cross cut sled and I was able to cut off both ends. Then I used my circular saw to square one long side to the edges.  After that I was able to run it across my table saw with the fence on and I had a nice square top. I gave it a good sanding up to 220 on the top and 150 on the bottom.

Since the cabinet is going into the corner of the room I gave the front a double round over (top and bottom) and a round over on the top right side but not the bottom.

I used Danish Oil on the top, then it was put on the cabinet.

Here is the finished cabinet.