One of the things that I have been needing to do since we moved was to make Stacey a new desk. In the old house we had a couple desks that were from Staples which were good enough but not worth taking apart and moving to be re-assembled again.
I bookmarked a post when I first started wood working and thought 'one day I will have the tools and time to do this'. Well, the time has come and I have the tools. See original post here.
Here are the Tools, Materials and steps involved.
Materials:
- 7 Pallets*
- 2 - 2"x4"x8' boards
- 4 Bolts 1 3/4"
- 4 washers that fit the bolts
- Glaze Coat (enough for your surface, see box for details)
- Danish Oil (or your oil/stain of choice)
- Wood Glue. Lots of it.

*Depending on the size of your table and how many good boards are on the pallet you could need quite a few. I ended up using about 7 pallets worth of lumber.
Tools:
- Thickness Planer
- Table Saw
- Circular Saw (can just use the Table Saw if you don't have one)
- Clamps, lots of clamps
- Orbital Sander (80 - 220 grit paper)
- Forstner bit (big as the washers if you have one, if not, no big deal)
- Socket and wrench to screw in the bolts
- Kreg Jig for pocket holes (off brand pocket hole system would work fine too)
Here you can see the starting pile of boards I have taken from pallets. Some are longer than others and that's fine. We want our surface to have lots of different lengths for the boards to be unique.
I have a long board that runs through my planer to allow me to feed work pieces in easier without having to worry about snipe. If you want to learn about snipe head over here, but basically, if your boards don't go in flat, the end can get planed deeper than the rest of the board.
You can't see it, but I also have my planer screwed down to my workbench so that it doesn't try to move while I'm using it. Although I emptied my dust collection system before starting this, I ended up filling the entire bag with wood shavings from the planer. I didn't realize it until the shavings started to pile up at the end of the planer. I was almost done anyway so I just let it keep piling up.
Here are all the boards planed up to the same thickness. They look like really nice boards and I've got a good variety of wood types too.
The next step is to start ripping your boards down to the correct width. Use your table saw to cut them at 1 1/2". You should get two pieces out of most of your boards. With the short boards you can use your table saw fence to trim off one side to have a nice straight edge and then flip it over to cut off your two pieces.
The longer boards will curve a little since your fence isn't long enough to keep the boards straight. If you have a jig that you can clamp the board to to rip a side off it first that would be best. I didn't really notice until I started to glue them all up that the long pieces weren't flat.
Its not a deal breaker if you don't have a jig for this, you'll just have a bit more to plane off after you glue your boards together.
Lots of nice wood here all lined up like good little soldiers.
Sometimes when I get into a groove I forget to take lots of pictures so you'll have to bear with me if this seems like a lot of text.
The overall desk top I was putting together was to be 32"x46". Now, I can't get something that big through my planer and I'm not a big fan of endlessly sanding. So the alternative is to glue up the desk in sections. I made three sections at 11"x46". I laid out all of my pieces and clamped it all together without glue and trimmed the edges off (that one I have a picture for). After trimming the edges, I glued it all together and clamped it up. I didn't have enough clamps to do all three sections at once, so I did the gluing over three days.
After you have all of your pieces glued together, it's time to run them through the thickness planer. It's important to note that a thickness planer will not give you a flat surface, it will give you a parallel surface. This is why some people hand plane boards before running them through a thickness planer. I do have a hand plane, though its not very good, and these boards turned out to be pretty flat already. Just take the flattest side you have and put that side down, this worked for me and the final product was nice and flat.
Okay, with all three pieces planed down here we have the final glue up. at this point I am really starting to like how this looks. It seems pretty obvious here but you will need clamps long enough to cover all three pieces or more if you are making a larger surface.
I have some Harbor Freight clamps on the bottom and some clamps I "borrowed" from my father on the top. If you are going to invest money into clamps to try and do something like this I would recommend you go with pipe clamps. They run between $10 to $15 for 3/4" clamps and about $12 for a 4' pipe. The benefit with pipe clamps is that you can get a coupler and make an 8' clamp really easily. I've had to do this for another project I'm working on and it is handy.
I sanded the table down to 220 grit and put a 3/8" round over on it. The table looks fantastic and Stacey was pretty happy with it at this point as well.
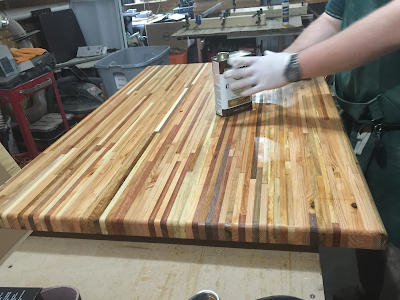
I'm not sure what it is, but this is the part of woodworking I like best. To be fair, it is really nice when everything you cut fits together as well, but putting stain or oil on a piece of wood has such a gratifying feeling. I am using danish oil for the table and it really brings out the color in the wood.
Stacey came out to take some pictures and watch the transformation occur.
Moving on to the legs for the desk, I used a couple 2"x4" pieces I had laying around to make the legs. I cut them a bit longer than I needed and glued them together. After they glue dried I put a round over on all the vertical edges and cut the bottom off flush.
To mount the legs to the table I made a couple skirts that get pocket hole screwed into the desk. I used dowels and glue to put the skirts together. After the glue dried I put a round over on the edges so you wouldn't get hurt if you bumped into it with your legs. Next, I drilled a couple holes with a forstner bit deep enough for the washer and head of the bolt and another bit a little smaller than my bolts to secure the legs to the skirts. Keep an eye out for smaller sized pallets, that's where I found the oak that the skirts are made out of.
The lighting isn't great but you can see the bolt head is recessed to be flush, or just below the surface of the skirt.
The last step before putting it all together was to glaze coat the top of the table. We have had a desk in my family for 15 years that we coated with a similar product and I still use that desk today. This stuff is basically a clear hard plastic coating. I ended up using two boxes of this stuff on the new table. Make sure that you read and understand the instructions that come with this before you give it a try.
I don't think I really needed to use both boxes of this but I wanted a nice thick coating on the table and had quite a bit of spill over.
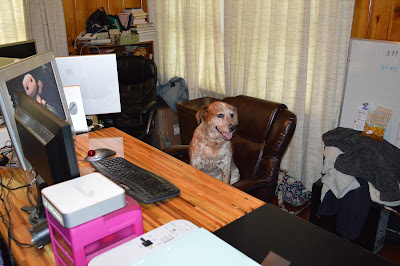
Here is a picture of the desk all put together. For the assembly we mounted the skirts for the legs using the pocket holes. Then secured the legs with the bolts. We are only using legs on the right side of the desk. The left side is being mounted to a filing cabinet.
I took a 2"x2"x24" piece of wood I had in the garage and secured it to filing cabinet with screw from inside of the filing cabinet. I also took a long strip of thin wood I had left over from making the top and used that on the inside of the filing cabinet since the wood is only particle board I wanted something a bit stronger to hold the desk. After securing the filing cabinet side to the 2"x2" I got under the desk and put a few screws into the desk to hold it in place.
And here is Chewie, acting like people. Let's just hope she doesn't figure out how to use the internet while we are at work. The last thing we need is more dog toys showing up from Amazon.


No comments:
Post a Comment