Sunday, December 14, 2014

Executive Footstool

I have had a cardboard box under my desk at work for about 3 years acting as my footstool. It has been taped up a few times to try and help it hold its shape, but the time has come to replace it with a proper footstool. 

I had a left over piece from another project that was about 12 inches wide. I used this to trace out the 2 base pieces, the center spacer, and the top board.


Here you can see the 4 pieces all cut out. I used the table saw to cut the board into 4 pieces. After that I used the band saw to cut out the pattern on the base pieces.

A little trick I picked up online watching videos was to use some double sided sticky tape to put the two base pieces together, then sand them at the same time. This makes sure that the pieces come out to be the same size after sanding.


After sanding all of the pieces down a bit, I applied a Minwax Provincial stain to all 4 pieces.


 Here are all of the pieces drying.


I had pre drilled two holes on either side, and four on the top after clamping up the stool and verifying that everything was square and flat. Then I put all of the screws in by hand to make sure that I didn't strip any of the holes out.

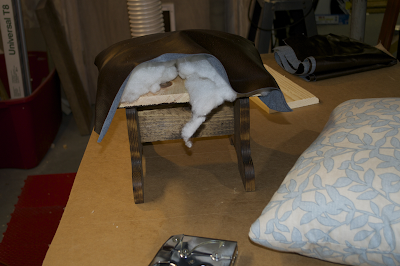
To assemble to top of the stool we used some leather we had salvaged off an old chair, and some stuffing from a pillow that is never used.


Below are 2 finished pictures of the stool. Overall the stool was very easy to make and only took about 2 hours all together, not counting drying time.


Sunday, November 23, 2014

Recent Pinterest Inspired Projects

Oh, Pinterest.  I keep venturing out to that land of wasted time.  The inspiration has kept me crafting though, so I think it makes up for all the time spent looking at adorable puppy and kitty pictures.

My first Pinterest inspired project was a soap pouch.  The tutorial I found was from Nikki at Whimsy Love.  I cut one pouch from a washcloth we already had and assembled it according to the tutorial.  Or mostly according to the tutorial.  The washcloth wasn't actually long enough (about an inch too short), so I fudged it a bit with the size of my seams and stuff.  Which didn't actually work.  Not enough fabric appears to continue to be not enough fabric.  Who knew?  :)


So I then squared up the remainder of the towel and used the principles from the tutorial to make a pouch that enclosed the soap widthwise instead of lengthwise.  But I didn't really measure it against the bar of soap I was using, so it's quite a bit too big for the little bar of soap I have lying around.


This one could work with some handmade soap, like Belmont Botanicals Lemongrass soap from Belmont Market in Wakefield, RI.  Oh, do I love that soap.  Or I suppose I can just unstitch my work, trim the fabric, and stitch it up again.  I don't think that's going to happen though.  I do think I will make a few more of these in the future, hopefully from a different towel and with the right measurements.

I then searched Pinterest for a fabric bin to use when picking up some of the random stuff that somehow ends up in the wrong room all the time.  I used Brett Bara's Oilcloth Storage Bin tutorial to make my bin, with one big modification.  I used cotton fabric for the outside and the lining, so it isn't super sturdy when it's sitting empty.


This took away some of the extra steps required when using oilcloth, but if I make another one I may pick some up to use.  I didn't see anywhere in the tutorial that the bag is reversible, probably because the oilcloth would normally be used on the outside, but with two layers of cotton it is perfectly reversible.  The way the bin is assembled, every seam is hidden except the last line of stitching that connects the two layers.  This bin was made from the same fabric as the zippered pouch I made a few weeks back.


The next Pinterest project was the Adult Seat Belt Travel Pillow.  I had come across other pins for the same pillow, but the links to the original project on pineapplemamalovescloth.blogspot.com all seem to be dead.  Since this pin includes the directions, I used it to create the pillow.  The instructions are very clear, and it only took about half an hour for me to make, including the time spent looking for a pillow that was already partially de-stuffed.  The pillow turned out great, and will probably be greatly appreciated during our upcoming trip to Tennessee.  I think I'll make another one too, so Lee and I both have one, in case we end up sleeping at a truck stop during future trips like we have in the past.


I have a feeling this won't be the last of my Pinterest inspired makes.  I'll try to actually take pictures of my progress for future projects instead of just finished objects.  Maybe I'll have some original ideas to post too.


Monday, November 17, 2014

Plastic bag holders and the truth about younger sewers


I decided to make a plastic bag holder for my Mom as part of her birthday present this year.  She had said that she liked the last bag holder I made, and I can recall many instances in which the plastic bags would have to be held into the pantry closet while closing the door while I was growing up.  This time, I chose to follow a pattern and use enough fabric, as the bag holder I made for myself doesn't actually fit a whole lot of bags.  I found the tutorial for a 20 minute grocery bag holder on the Craftiness is not Optional blog.  This tutorial was very detailed and easy to follow.

Fabric trued up, cut to size, pinned, sewed, and pressed.


While sewing the first seam, I realized that I was just using my standard seam allowance instead of the allowance called for in the pattern. Since this is supposed to have a French seam, I'm guessing that the called for seam allowance is set that way for a reason.

This awareness of fudging the pattern made me chuckle to myself.  In one discussion during a recent machine owners class at the Smith Owen Sewing Center this exact topic came up.  One of the participants was asking if there was a foot or marking on the plate that would make it easy to get a consistent 5/8" seam allowance for sewing clothes.  This digressed into a conversation about how younger sewers don't necessarily play by the old sewing rules when it comes to seam allowances and the like. Being relatively new to sewing, I didn't really have an opinion on the subject. And here I am, less than 24 hours later, basically just winging it and only loosely following the pattern. I guess they were right.

So I measured my normal stitch, where I just line up the edge of the fabric with the side of the foot, and amazingly enough, it's 3/8". Since I managed to do this right so far, I decided to continue and actually try to follow the directions.


5/8" seam measured and sewed.  That is a huge seam allowance!  First French seam complete.


Next up, the bottom and top edges are folded and pressed to create a casing for the elastic.


A piece of ribbon is attached to one edge to create a loop for hanging the finished holder.


Then these casings are sewn, leaving a small opening to pull the elastic through.


I used a safety pin to pull the elastic, with a pin on the other end of the elastic so that the whole piece did not get pulled through.


I did find that it is easier to pull the elastic through so that it would go past the side seam in the same direction the seam was pressed down.  When I tried to pull the elastic through the bulk of the seam first, the pin had to be adjusted several times to get around all of the layers, as it wanted to go into the middle of the seam and would then have nowhere to go.

Once the elastic was pulled through, I sewed the two ends together.  This was a horribly fiddly step.  Any suggestions on how to do this more efficiently?


The opening for the elastic was then sewed closed and the bag was turned right-side out.  


Ta-da!  Finished plastic bag holder.  Happy Birthday Mom!


Sunday, November 9, 2014

Crocheted dishcloths and towels

One of my lovely cousins got married this November.  As we travelled a fair distance to attend her wedding, I wanted to give a gift that falls further into the thoughtful category than the expensive category.  After reviewing her gift registry, I think I came up with an idea for a great gift.  Her wish list contains quite a few awesome pieces of purple cookware and small appliances.  Since she seems to be aiming for purple additions to her kitchen, a beautiful set of purple cotton dishcloths and towels should be well received.

I used Bernat Handicrafter Cotton DeLux yarn in the 78320 Purple colorway to make the Alwine's Dishcloth pattern by Melinda Miller.  I must say that I am in love with this pattern.  The border row and the recommended invisible join make the perfect end to this project.


I originally planned to make a variety of dishcloths, but after trying several other patterns that were not written well or had instructions that were far too complicated for the simple look of the design, I decided to make a set from this pattern, and then increase the pattern repeats to add some kitchen towels to the set.


I hope they like this set.  (Don't mind the color, the lights were very yellow in the cabin.  The pictures above are truer in color.)


To see more pictures or notes I took while crocheting these towels, check out my project page on Ravelry.

Sunday, November 2, 2014

Book House

My wife reads a lot of books. How many is a lot? Well, she wanted to read 52 last year and finished that many in about 5 months. I have seen wooden book rests in the past made out of wood, here is a link to a few, and I figured it would be a nice thing to make for my wife. I didn't want to just make a simple triangle that served no purpose when not in use though. So I thought building a book house rather than a book rest would be better.

I had been wanting to use some of the pallet wood I had taken apart, but until I got a planer I didn't really have a way to make these boards nice and usable. So this project has been floating around in my head for about 5 or 6 months. Once I got the planer, these were the first boards planed to make the 5 sides of the book house.

Here are the rough boards before I planed them. They had quite a few imperfections and the large board had a slight cupping to it.


 Here are the 3 boards after being planed down and jointed on the sides that are going to be glued together. You can see here that the middle board lost that red tint that it had. One step that I missed here and didn't realize until it was to late was to rip one of the side boards using the jointed side as a reference edge. So after the board was glued together, I had to just kind of wing it to get everything squared up.


The next step was to glue the boards together. I'm sure I probably overkilled it here a bit with the clamps, but I didn't want any of them to feel left out.


And here is what the board looked like after it was glued, cut down to size, and planed again. 
There was a bit of planer snipe at the end of the board, you can kind of see the lines at the top of the board in this picture. I plan to make a better in-feed and out-feed table for the planer to address this.

On a side note, if anyone knows what kind of board the center one is leave a comment. I'm pretty confident that the right and left side pieces are Oak. 


I cut the bottom and sides out of the board above on my table saw with my crosscut sled, then went over to the bandsaw to cut out the finger joints. I wasn't entirely happy with how the finger joints came out, as they are a bit loose. For the next set of joints I used a dado blade on my table saw.


Here are the rough boards I am going to plane and glue up to use for the top piece. It is going to be longer than I need, but I wont complain about having some left overs.


The board looks pretty good after being cut to length and planed down a bit. 


The roof section here is cut a tad bit wide since I figured I would cut to the exact length after I had all of the pieces ready. Doing it this way will give me a bit of scrap that I can use to test finishing options as well as saving me the time of doing the math.


On the left you can see the base section being glued together and on the right is a closer shot of the top sides of the base. I ended up making a couple 45 degree angled cuts to give the roof somewhere to sit. 


I don't have any pictures of gluing together the roof but it was a pretty simple clamp up being a 90 degree angle. The next step was to attach the roof to the house. Since I didn't have a good way to clamp this together, I ended up using ratchet straps. This seemed to work very good. As you can see on the left side where the roof meets the base its not quite square. I think this is partially due to my finger joints being a little sloppy. 


After unstrapping the house and giving it a good sanding from 80 grit to 220 grit this is what it looks like. I intentionally put the knot and hole on the outside of the piece, my wife likes the look of those parts of the wood.


I tested some Tung and Danish Oil on a couple of the scraps from this project to see which would look better. They were pretty close in finish to be honest but the Tung Oil won out in the end.

This is what the finished product looks like after 2 coats of Tung Oil and a bit of sanding with some steel wool.


I took a few of my wife's books and threw them in the book house. I think this turned out pretty well.
The shot on the right is my favorite. I love the way the fingers look dark at the seam on top.